So, for a very long time now I’ve wanted to upgrade my older original Cigar Oasis to have Wi-Fi or as Cigar Oasis calls it … a “Smart Humidor“. However, I didn’t want to buy the Cigar Oasis Wi-Fi Attachment Module. Which it now looks like you can’t even buy it, you have to purchase a whole new Cigar Oasis Excel with Wi-Fi all over again. With that said I wanted to build my own Cigar Oasis DIY style WiFi device and have full control and not worry about some company sharing data or be stuck with some crappy user experience. Granted that was with one main stipulation, this project had to all fit in the original Cigar Oasis shell.
Update: I now see at the end of June at IPCPR Cigar Oasis is about to release their third version with integrated Wi-Fi for the Excel model [Cigar Coop – link]. Which hasn’t shown up yet on Amazon, so not yet sure of a price point.
To be fair I want to be upfront and state that I have never read Cigar Oasis’s Terms and Conditions on data sharing and as of writing this tutorial I have never seen Cigar Oasis’s app or website interface for displaying humidor data.
So when I first started this project years ago, I had a working prototype that was writing the sensor data to a MySQL database. But it took far too long to setup and needed a bunch more coding to even be considered an alpha release. In other words it needed more coding than I had time!
But after years of thinking about this cloud humidification device, I jumped back on the project and was done in a couple days and here is how it looks in my humidor with the cover off. Not super pretty but it does fit perfectly inside the original shell. No, almost closing here!


As you can see in the photo above I also have a Cigar Oasis XL. I just wanted to ask the question of do you really want to have buttons or LED display on a connected humidification device? Every time you open your humidor it takes time for the humidity to level back out! I personally don’t like the idea of buttons at all on the device and that’s another reason why this DIY solution works best for me. Now adding a few buttons and an OLED to set desired humidity wouldn’t be all that hard either but this tutorial is just the basics in the device and make the interface do all the heavy lifting. Besides I don’t have a window in my humidor so, at least for me they are completely pointless in my use case!
Here is the current iteration of the Dashboard in Node-Red. I say current because I’ve already started collecting the temperature and humidity data in a MySQL database to have a year long historical chart. Data that I can archive and in the future, display. This was a few of the things I wanted to see.

So while this is the journey I took to accomplish this project I’ll walk you through like it’s a tutorial. With that said you won’t get too much feedback in comments from me.
Warning: this tutorial is also going to assume:
- That you know how to search Google and YouTube for answers to any question you may have here.
- That you already have an old Cigar Oasis or a waterproof container.
- That you know how to solder. (It’s not that scary and you may want to check for a Maker Space / Hacker Space in your city since most have classes on how to solder.)
- That you have some knowledge of Linux and already have an old computer or a Raspberry Pi that you have already installed Linux on!
- That you have some knowledge on how to assign an internal static IP to your Raspberry Pi or old computer in your router.
- Finally that you know how to search Google and YouTube for answers to any question you may have here. Didn’t he already mention that?!? YES!
Overview of the three open source technologies I’m utilizing in this project:
-
Mosquitto – Open source MQTT broker
-
Node-Red – Open source simple flow-based programming for the Internet of Things
-
Tasmota – Replacement firmware for the Wemos D1 Mini
As far as software goes, that’s really all there is to getting this up and running. Whether or not you want to make it cloud based is totally up to you. Personally, I’m good with only having this exposed to my internal network and using things like the Node-Red module for “Pushover” to send me notifications.

The good part was I still had all the components on a breadboard from three plus years ago. This photo is with a couple extra light sensors and the Adafruit Huzzah before I decided to change it out with the Wemos D1 Mini. I had also removed the power barrel jack, TIP120 and the fan by the time this was taken.
Initially I thought I could use the light sensors to show when the humidor was opened. However, even in humid Florida you see a 10% plus drop in humidity when the humidor is opened for more than 15 seconds.
So lets start with the basic parts list and a.k.a. the cost without tools (e.g. micro-USB cable, soldering iron, solder, wire strippers & etc.)
My basic parts list (Direct links and not affiliate)
- ($3.50 USD / Piece) [Ali Express] LOLIN D1 mini V3.1.0 – WEMOS WIFI
- ($2.80 USD / Piece) [Ali Express] 20 SETS Mini Micro JST 2.0 PH 2-Pin Connector plug with Wires Cables 120MM
- $14.95 USD / Piece) [Adafruit] Adafruit HTU21D-F Temperature & Humidity Sensor Breakout Board
- ($2.50 USD / Piece) [Adafruit] TIP120 Power Darlington Transistors – 3 pack
- ($1.25 USD / Piece) [Adafruit] LD1117-3.3 – 3.3V 800mA Linear Voltage Regulator
- ($5.99 USD / Piece) [Amazon] 10Pcs 5 x 7 cm DIY Prototype Paper PCB Universal Board New
Basic Total:
$30.99
Extras:
- ($13.95 USD / Piece) [Amazon] Noctua A-Series Cooling Fan Blades with AAO Frame, SSO2 Bearing – NF-A4x10 FLX
- This for me was a must! I wanted this to make mine, a lot more quiet than the original cheap Chinese fan!!!
- ($14.95 USD / Piece) [Adafruit] Mini DC/DC Step-Down (Buck) Converter – 3.3V @ 1A output
- There is much cheaper options. I already had a few of these that I needed to use in some projects.
Basic & Extras Total:
$59.89
Server Extras:
($35.00 – $39.00 USD / Piece) [Amazon] [Adafruit] Raspberry Pi 3 B or Raspberry Pi 3 B+ (Optional: Old computer with Linux & HardDrive)
($17.00 USD / Piece) [Amazon] 64GB Micro SD Card (Optional: Old computer with Linux & HardDrive)
Basic & Server Extras Total:
$82.99
REMEMBER:
- The Cigar Oasis Excel with Wi-Fi is right around $104.00 on Amazon.
- This is an all in one solution as well. If you’re tight on space the extra module is pretty annoying!
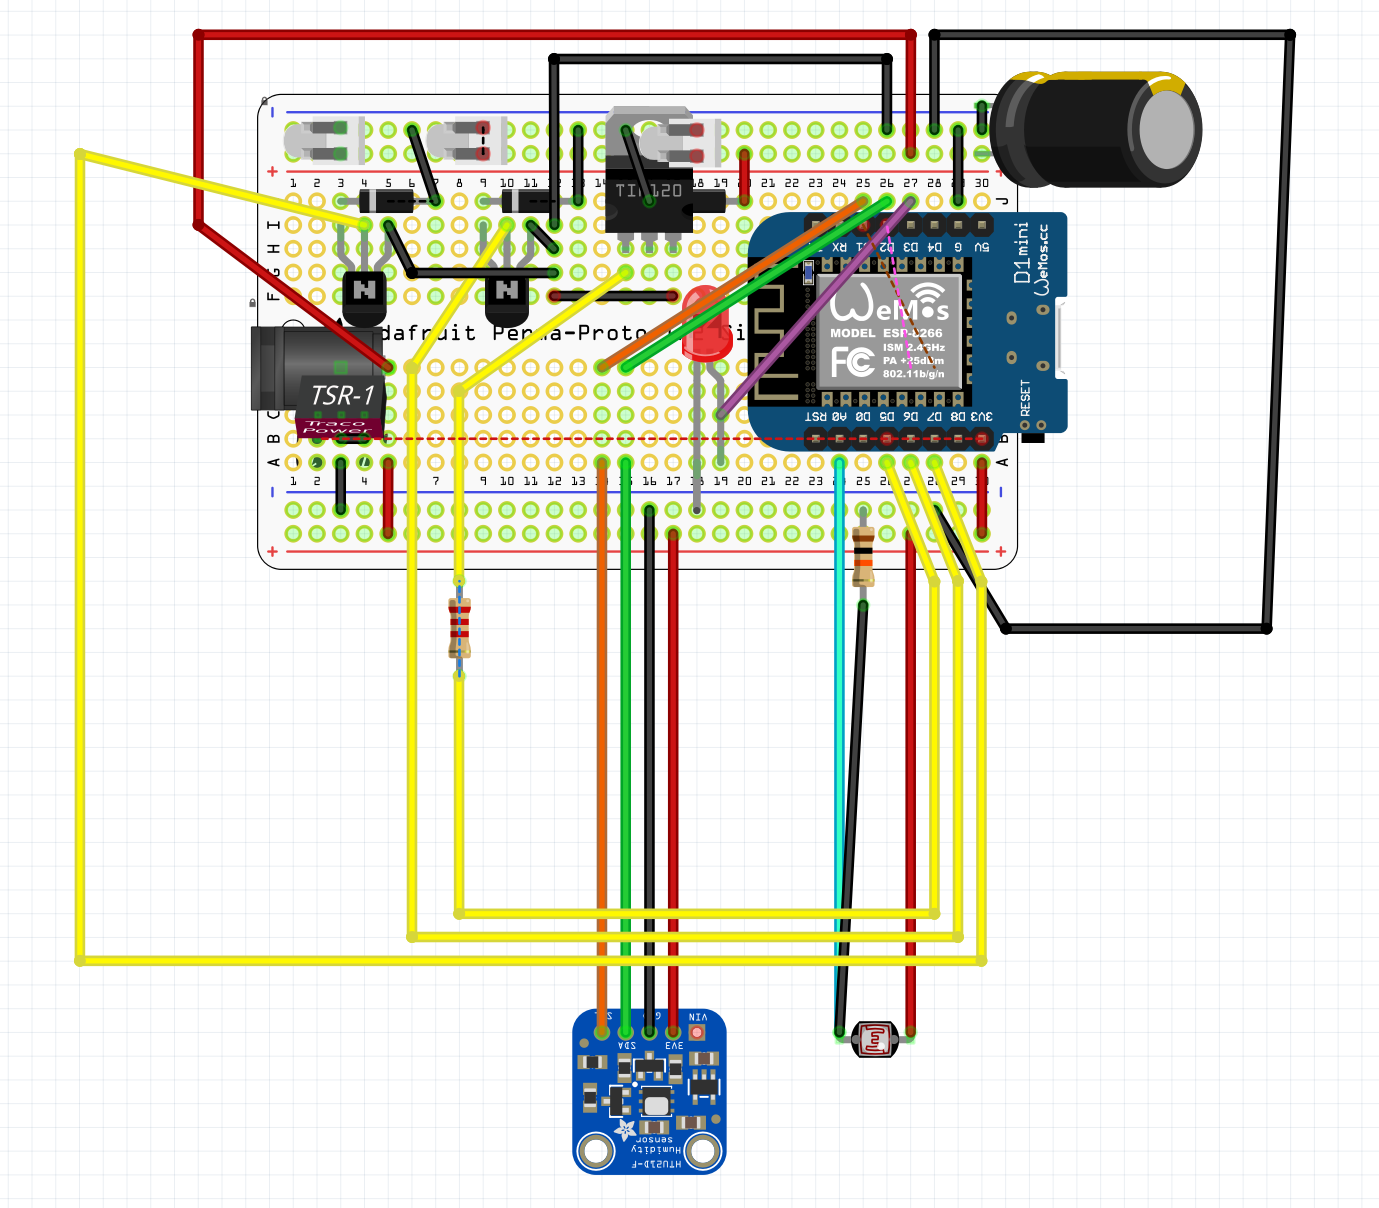
Hardware: Building the board
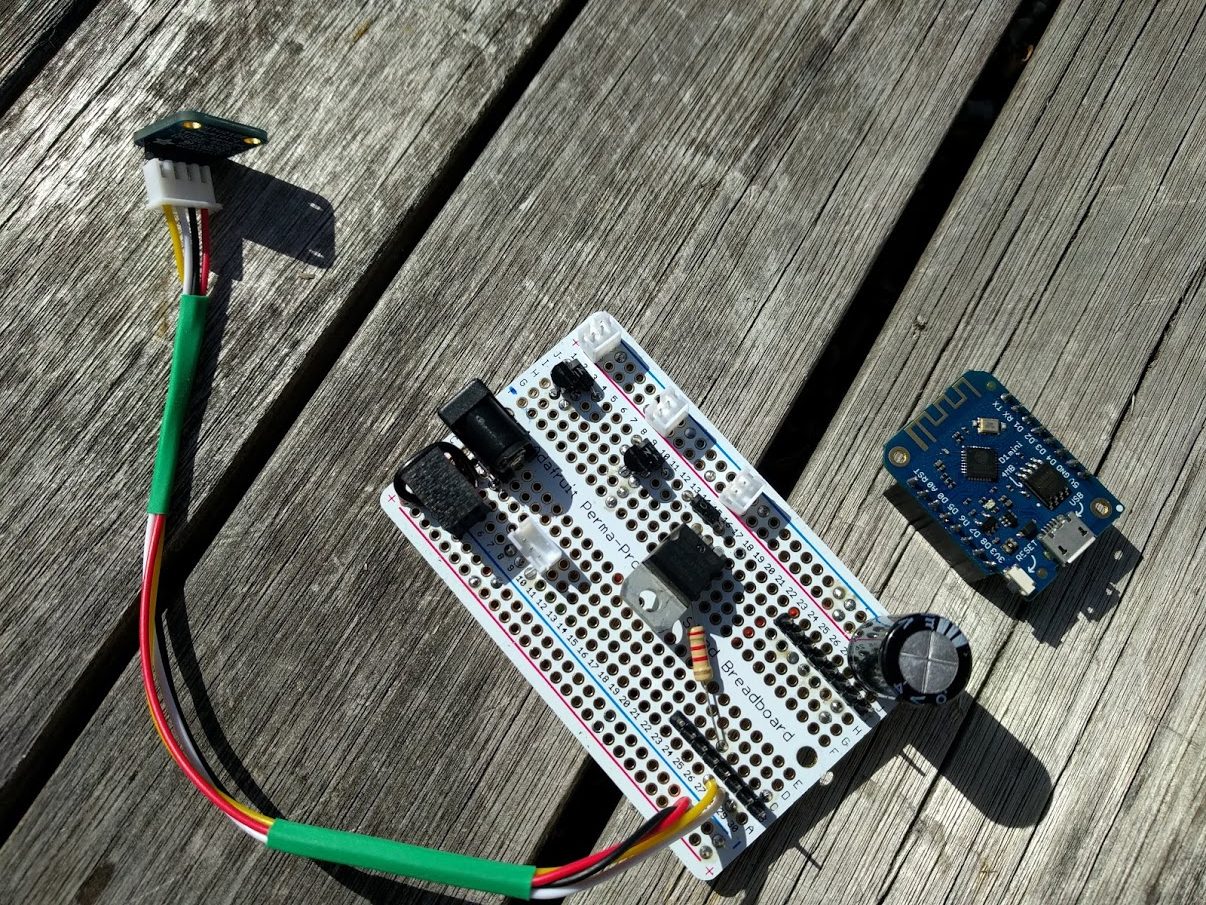
Unfortunately I’m writing this tutorial after completion and didn’t take photos throughout the process. All I can truly show is the board disassembled. I made it modular to where I could change out pieces if something went wrong or if I wanted to add something new.
The base perf-board with the TIP-120, Traco 3.3v Mini step-down, fan connector, HTU21D-f sensor connectors and Wemos D1 Mini connectors.

Here is the original Cigar Oasis 3-Pin connector mounted to a piece of perf-board. Again made this modular to where I could pull it off the board to get access to other components.

The connector gets mounted into the Cigar Oasis connecting to the female header pins on the base perf-board. You can see the Wemos D1 Mini by itself off to the side.

Here is how the HTU21D-F was put into the cigar oasis. Again modular to where it can be changed out if needed or changed out to another temp / humidity sensor.

Everything put together without the cover and reservoir.

Height check with everything installed.

Moving on-to the reservoir and some modifications made here. I ripped open the original reservoir and added some JellyBeanZ Brand I bought off Amazon. I bought a pound which is some major overkill! I barely needed to line the bottom of this reservoir and with them and it overflowed to the point where I had to remove a bunch.

Here I made some modifications to the top of the reservoir to create a new opening that the fan could get to a little better.

Final photo of everything together ready to go into my humidor.

Note: For anyone truly interested in building their own let me know in the comments and I’ll create a Fritzing wiring diagram with all of the components I used.
Software: Get everything up and running
Installing the MQTT broker:
Since I have already written a MQTT tutorial you can check that out [Mosquitto – MQTT Broker Install] or if you need a better understanding of MQTT be sure to check out The Hook Up’s [YouTube: Understanding MQTT]
NOTE:
- For simplicity sake this tutorial will assume you have a Raspberry Pi and already have Raspbian or Ubuntu installed on your Pi.
- Also, Raspbian already has Node-Red installed so if you do have Raspbian, you shouldn’t have to sweat that install.
- If you really don’t want to read my other tutorial on how to setup MQTT you can watch a video on YouTube, another alternative would be finding an online MQTT cloud service.
- I can’t recommend any online services since I’ve never used any but this is the first one that comes up in a Google search: https://www.cloudmqtt.com/
- Follow this tutorial to get MQTT setup on your Raspberry Pi:
Before proceeding with these steps. They make the assumption you have some knowledge of flashing a MCU or that you can do a simple search on YouTube to learn how. In other words I won’t be all that helpful in the comments!
- Now that we have all the hardware built, MQTT installed we can start flashing the Wemos D1 Mini with Tasmota.
- Here are the full details to get started with Tasmota on the D1 Mini, or you can go step by step below. [YouTube: Fully Detailed D1 Mini – Tasmota Instructions] I’m a big fan of DrZzs!! Watch all his videos!
- First make sure that your computer can see the Wemos D1 Mini by installing the USB driver. [Download Here]
- Next if you don’t already have the Arduino IDE setup on your computer, go ahead and install the Arduino IDE [Download the Arduino IDE]
- Once the Arduino IDE has been installed make sure you install / have the ESP8266 libraries installed. [YouTube: Instructions]
- Finally get Tasmota’s libraries into the Arduino IDE [YouTube Instructions]
- My Arduino IDE settings for flashing the D1 Mini. NOTE: Understand that your Port > Com will probably be a different! Also to avoid any WiFi issues with Tasmota set “Erase Flash:” to “All Flash Contents”.

- Before flashing the D1 Mini and with sonoff.ino opened in the Arduino IDE. Be sure to modify the user_config.h tab with your specific settings.
#define PROJECT "humidor-name-here-with-no-spaces"- If you don’t know or are unsure how to setup static IPs leave these alone:
#define WIFI_IP_ADDRESS "192.168.1.200" // Set a unique static IP to make Tasmota easier to find#define WIFI_GATEWAY "192.168.1.1" // Match to your Gateway#define WIFI_DNS "1.1.1.1" // This is the free CloudFlare DNS
- Setup the location of your Mosquitto MQTT server:
#define MQTT_HOST "192.168.1.100" // Whatever your MQTT static server IP address is!#define MQTT_USER "mySuperSecretUser"#define MQTT_PASS "mySuperSecretPassword"
#define WEB_PASSWORD "myTasmotaWebInterfacePassword"#define FRIENDLY_NAME "Humidor Location Name" // This way when you have more than one you can tell them apart!#define WEB_USERNAME "myTasmotaWebInterfaceUsername"
- At this point you should be good to flash the D1 Mini in the Arduino IDE.
- Once flashed, open a browser and attempt to load the Tasmota web interface by typing in the IP you set in the Tasmota configuration.
- Log in to Tasmota with the credentials you flashed the board with and you should see a super simple menu.
- Under Tasmota’s “Configuration” > “Configure Module” – You will need to change the “Module type (Sonoff Basic)” to “18 Generic” and click “Save”.
- Once it has rebooted go back into Tasmota’s “Configuration” > “Configure Module” – And set your GPIO’s to the sensor and fan.
- Note: you will see the lables in Tasmota as “D4 GPIO2”. The Wemos D1 Mini lables their boards a little different, so what you see as D4 on the board is really “D4 GPIO2”. Just don’t confuse the D* as GPIO*.

- Click “Save” again and you should now be able to see your HTU21D-F sensor automatically pop in the main menu after a few seconds and also be able to control the fans power state.

If you’re concerned about WiFi signal being low since this DIY Cigar Oasis lives inside the humidor. The Lolin Wemos D1 Mini’s have pretty good signal strength. Mine lives a couple rooms away from an access point and I still have over 50% signal strength. Another option for boosting the signal would be to checkout the generic Wemos D1 Mini Pro with an external antenna for an additional dollar.

Installing Node-Red
- Again you should be able to skip this step if you have Raspbian. If you don’t have it installed here is a good video on installing Node-Red. [YouTube: Node-Red Tutorial]
- Install “node-red-dashboard”.
- Start by removing “node-red-contrib-ui”
- Top right hamburger menu > “Manage pallet”
- Under the “Nodes” tab find “node-red-contrib-ui” and remove.
- Install “node-red-dashboard”
- Once removed click on the “Install” tab and in the search box type in “node-red-dashboard” without the quotes.
- From there restart Node-Red or you can restart your Raspberry Pi.
- Start by removing “node-red-contrib-ui”
Node-Red Flow
1. Download: node-red_diy-cigar-oasis.txt from this site.
2. Open the downloaded text file in Notepad on Windows or Preview on the Mac and select everything and copy.
3. Install it by selecting a tab in Node-Red. Hamburger Menu > “Import” > “Clipboard” & paste what you have copied from the text file.
Disclaimer:
Before you continue by downloading and using my Node-Red Humidor Flow, understand that any historical humidor data loss that happens over time in relation to this humidor flow is on you for trusting some random persons instructions and code on the internet. If you lose any other data unrelated to humidors you did something else very, very wrong, not me! Node-Red code is just JavaScript and is easy for you to audit, so please audit everything you use!
Download the Node-Red Humidor Flow:
Now with all that said to save you some time here is my Node-Red Humidor Flow.
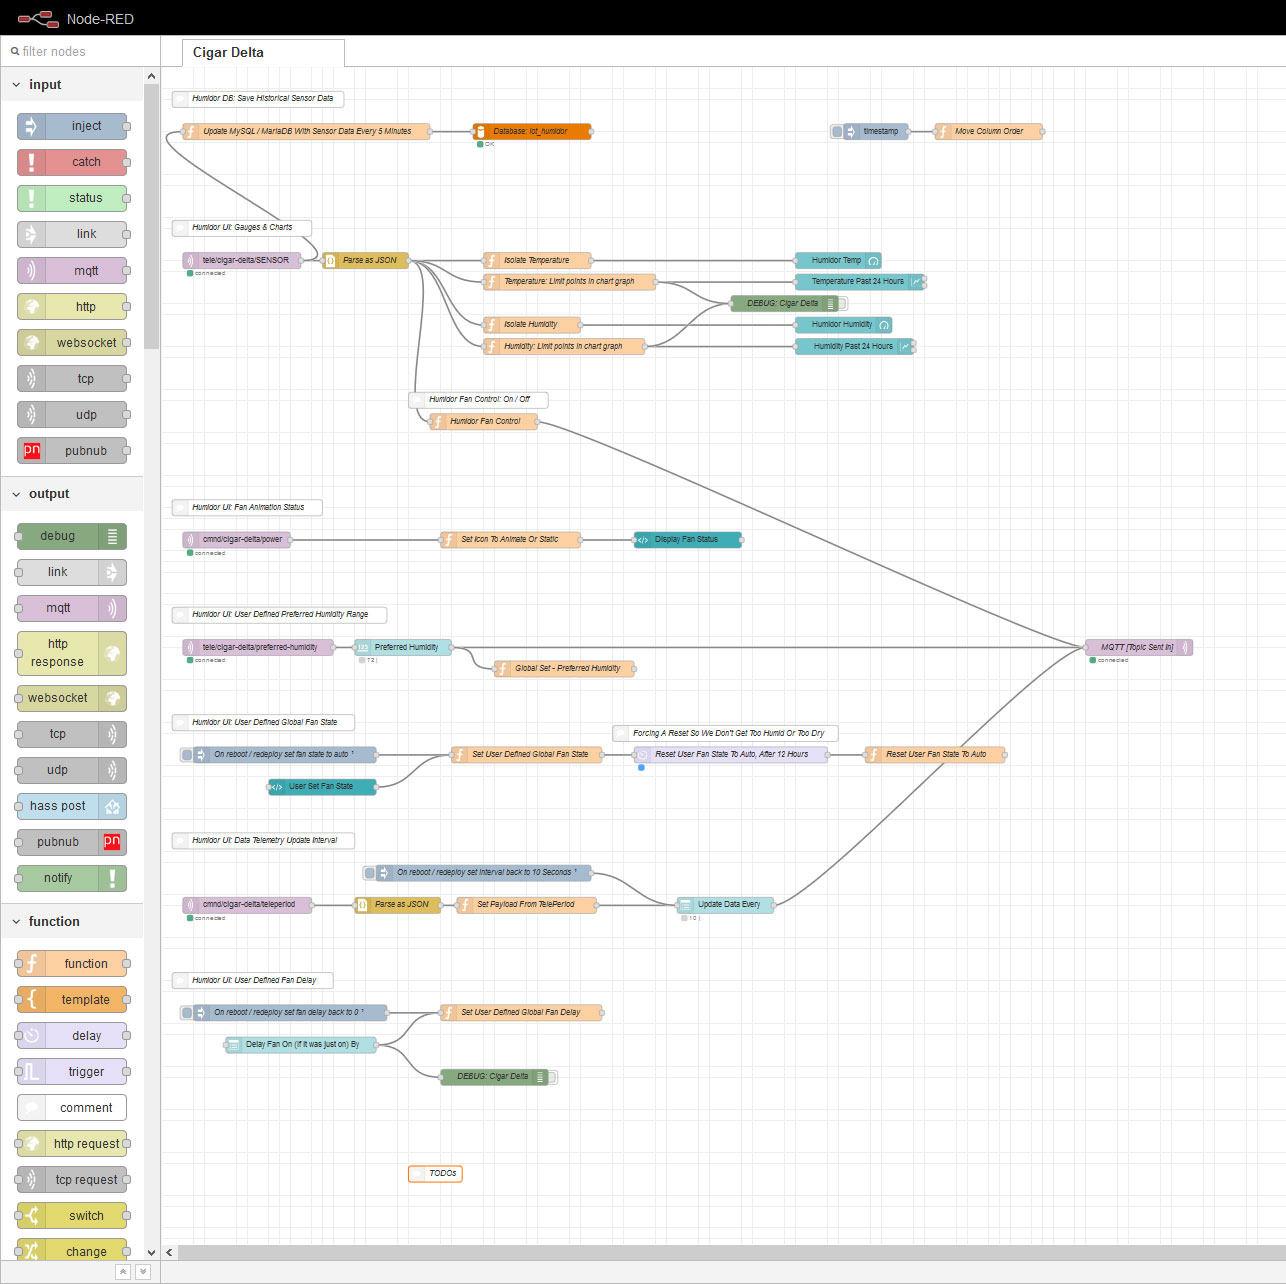
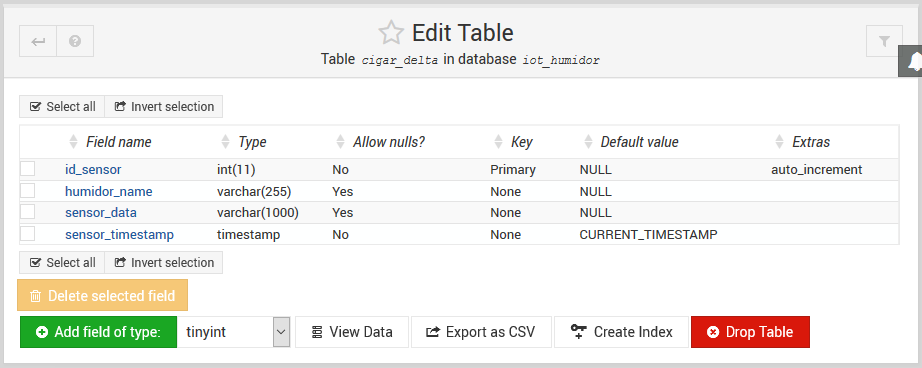
Now while this isn’t needed to make everything work in the Node-Red you will see a MySQL database connection. For anyone wondering here is the structure of the database table:
Note: Currently I’m only saving the data not displaying it yet. If you end up doing this project and don’t understand why the flow isn’t pulling in this data it’s because I didn’t set it up.
Finally this is all just my personal opinion and I know it will rub a few the wrong way so apologies in advance but here goes.
I originally started this project because I didn’t think the value of the Cigar Oasis really reflected the price. Sure it worked and kept my cigars humidified but for something that should have been $30-$50 in my opinion, this $100+ humidification device did not even meet my expectations. It was a neat device but realistically a huge pain in the ass! Getting this thing originally setup was no picnic. I would have to set the dial close my humidor, wait a day and see where it leveled out, adjust it again wait another day etc.. It literally took days to get the humidity just where I wanted. Looking back we were the early adopters / beta testers and that always sucks. They have come a long way since then!
Another problem when I first purchased my Cigar Oasis is that I had it in the my office which was next to my bedroom and the cheap Chinese whirring fan inside the Cigar Oasis woke me up all hours of the night. To the point where I would get up and unplug the thing. Being someone who has done a lot of research on fans for PCs I knew spending a bit more money would make this thing far quieter. We for sure paid a premium price but again in my opinion did not receive premium parts.
Finally being a web developer and working with website user interfaces all day I wanted an interface where I could control everything. Granted for completion sake I didn’t worry about the final interface design too much since Node-Red’s Dashboard UI was good enough for this project. I’ve added some custom AngularJS touches but that will take some time before it’s where I even want the UI to be.
To-Dos:
- Connect the data with yearly historical charts.
- Connect “Pushover” in Node-Red to notify me if the fan has been on for a certain amount of time and humidity continues to decrease, a.k.a. it needs a water refill.
- Create REST APIs in Node-Red so that I can create a mobile friendly interface for accessing anywhere in the world. The current Node-Red dashboard is working fine a.t.m.
Final thoughts:
- If I were to do this all over again I would just order a waterproof container that was more of a perfect size for my humidor and not worry about the Cigar Oasis shell.
- Also, I don’t think this is even a perfect solution but it works great. If you don’t like it, it’s not a problem for me.
- With that said, my next waterproof container iteration will have to wait. I did just come across a Cigar Oasis Magna super cheap (around $20) and I plan on dropping the same hardware in that with extra connectors for the additional fans. I may do an article once completed for that one as well and post it here.
- I’ve had this running for about a month now and have been squashing bugs here and there. I have also been working with the interface in Node-Red a bit to make it a bit more useful for me. Let me know what you think if you end up trying this project out!
- I have been writing this post on and off for the past few weeks. If you think I missed something let me know in the comments. I already for-see some massive edits coming to this article, just help point them out in the comments! Sometimes you just need to get something out there.
Legal:
All product names, logos, and brands are property of their respective owners. All company, product and service names used in this website are for identification purposes only. Use of these names, logos, and brands does not imply endorsement.
Cigar Oasis is trademark or service mark of Cigar Oasis Inc.
All other trademarks cited herein are the property of their respective owners.
Hello! First, – Thanks for this very good and specific Tutorial! I want to open My Cigar-Oasis-Device like You did, and hope You can answer My Question!? I have Hotair and Spudgers, but have not make such thing yet, and want to ask You, can You Please say Me how to do!? Go the Cigar-Oasis easily apart when warming with Hotair (because glue get soft), or are there any clips what holding the Plastic-Parts together!? Thanks!
Sure thing. The Cigar Oasis I have here is the older version. All I did was get the lid removed was to get a small part started in the middle with a small flat head screw driver. From there I just slowly worked around the lid with another screw driver until it popped off. The glue did a good job of holding it together but I don’t remember any clips or plastic parts holding it together. It was pretty tight but slowly gave in to being opened. So I didn’t use any heat but a spudger is probably the smarter way to go!
Lately I’ve been thinking about 3D modeling the entire top piece to be able to 3D print the upper piece and not even have to worry about breaking the original. Just need some time to get it modeled up and test printed.
Hope that helps!
I’d like to build one of these or similar and I have a bunch of questions if you don’t mind.
1. Can you provide a wiring diagram so I can build the module?
2. The hardware will work with any container correct?
3. Did you use beads that release at a particular humidity, and the fan is responsible for pumping the moisture into the humidifier at the required rate correct?
4. Do you happen to have a way to integrate this with a home automation system such as homebridge or is that something that’s even possible?
I don’t mind at all. It’s been a long while for me but I’ll help where I can.
1. I now realize I totally missed creating and adding a wiring diagram for this project, sorry about that! With that said I never made one but I made one for my next project … a conversion of the Cigar Oasis Magna. The Magna has three fans and a neo-pixel led. While the wiring diagram has a light sensor I never added it to the the final board. Also, you’ll need to go through the wiring diagram in that it’s been so long, I would doubt its 100% accurate! As well as I never mapped all the traces. I’m very much a sloppy DIY-er!
So while I’ll eventually get a write-up on my DIY Cigar Oasis Magna on here one day … here is some info until I do.
Wiring Diagram:
Board:
Completed:
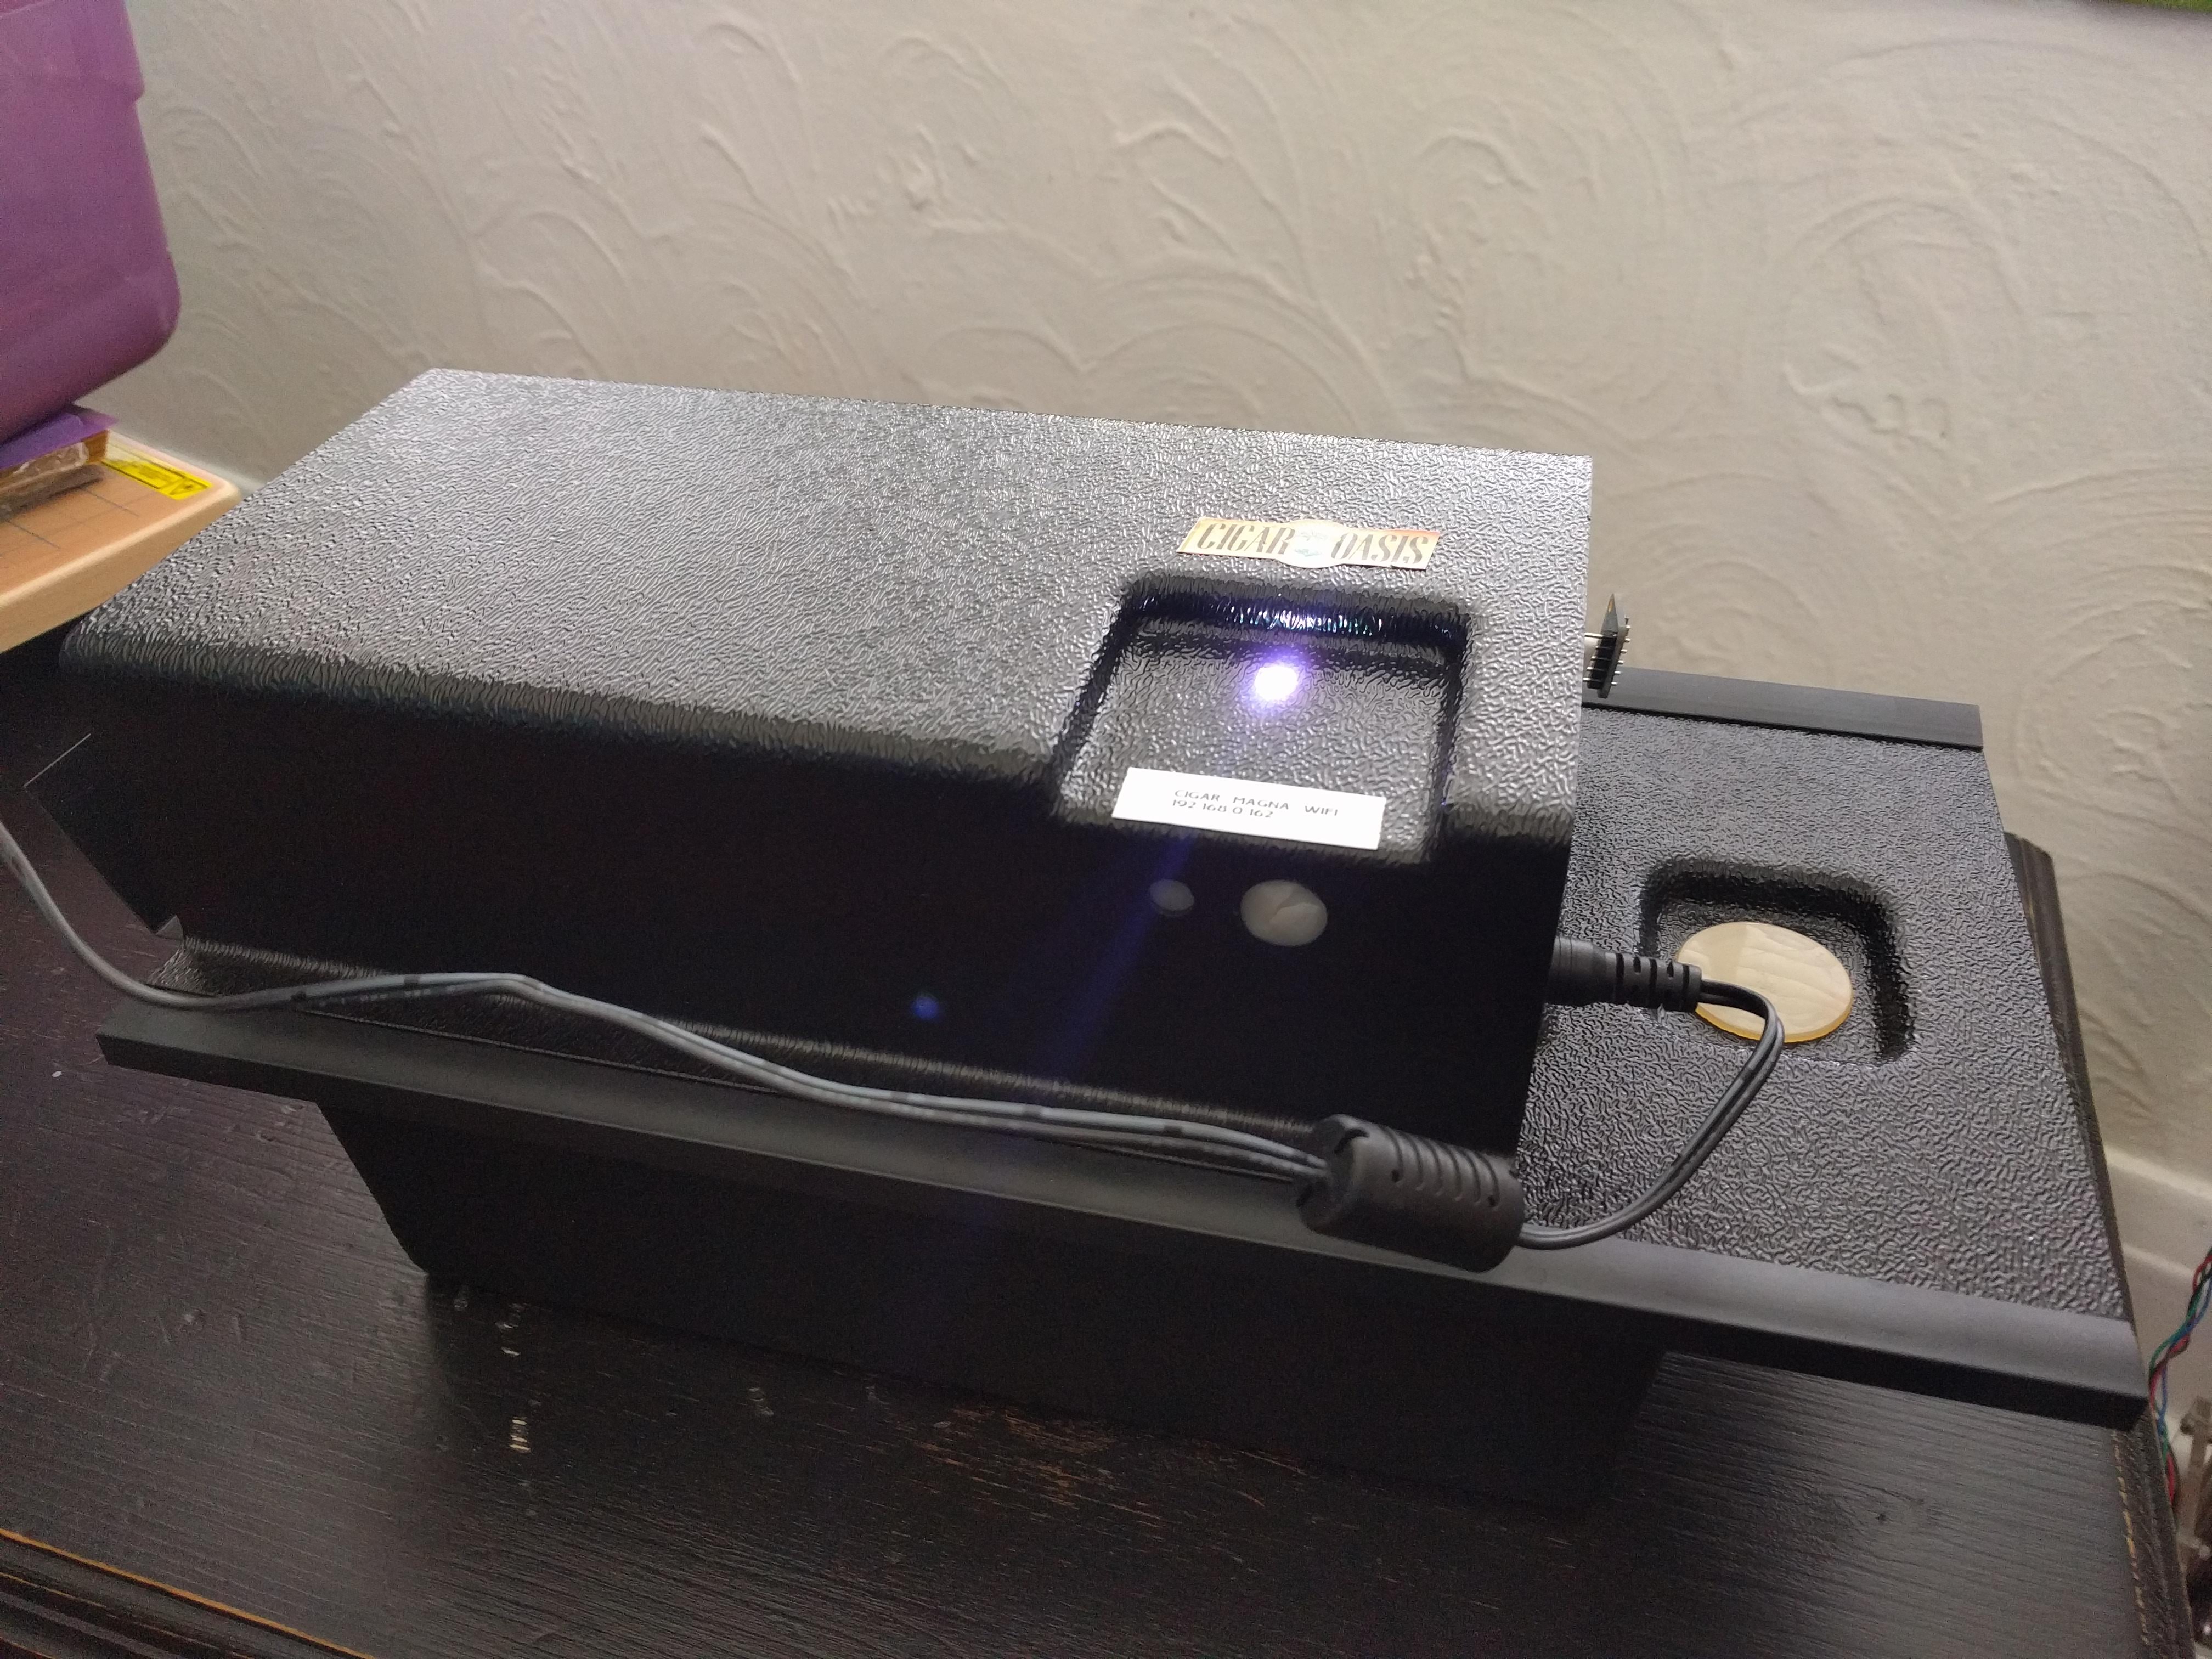
2. Correct, any container will work! I got into 3D Printing and 3D Modeling less than a year ago and decided to see if I could model my own container. So here’s a peek at another project I was playing around with:
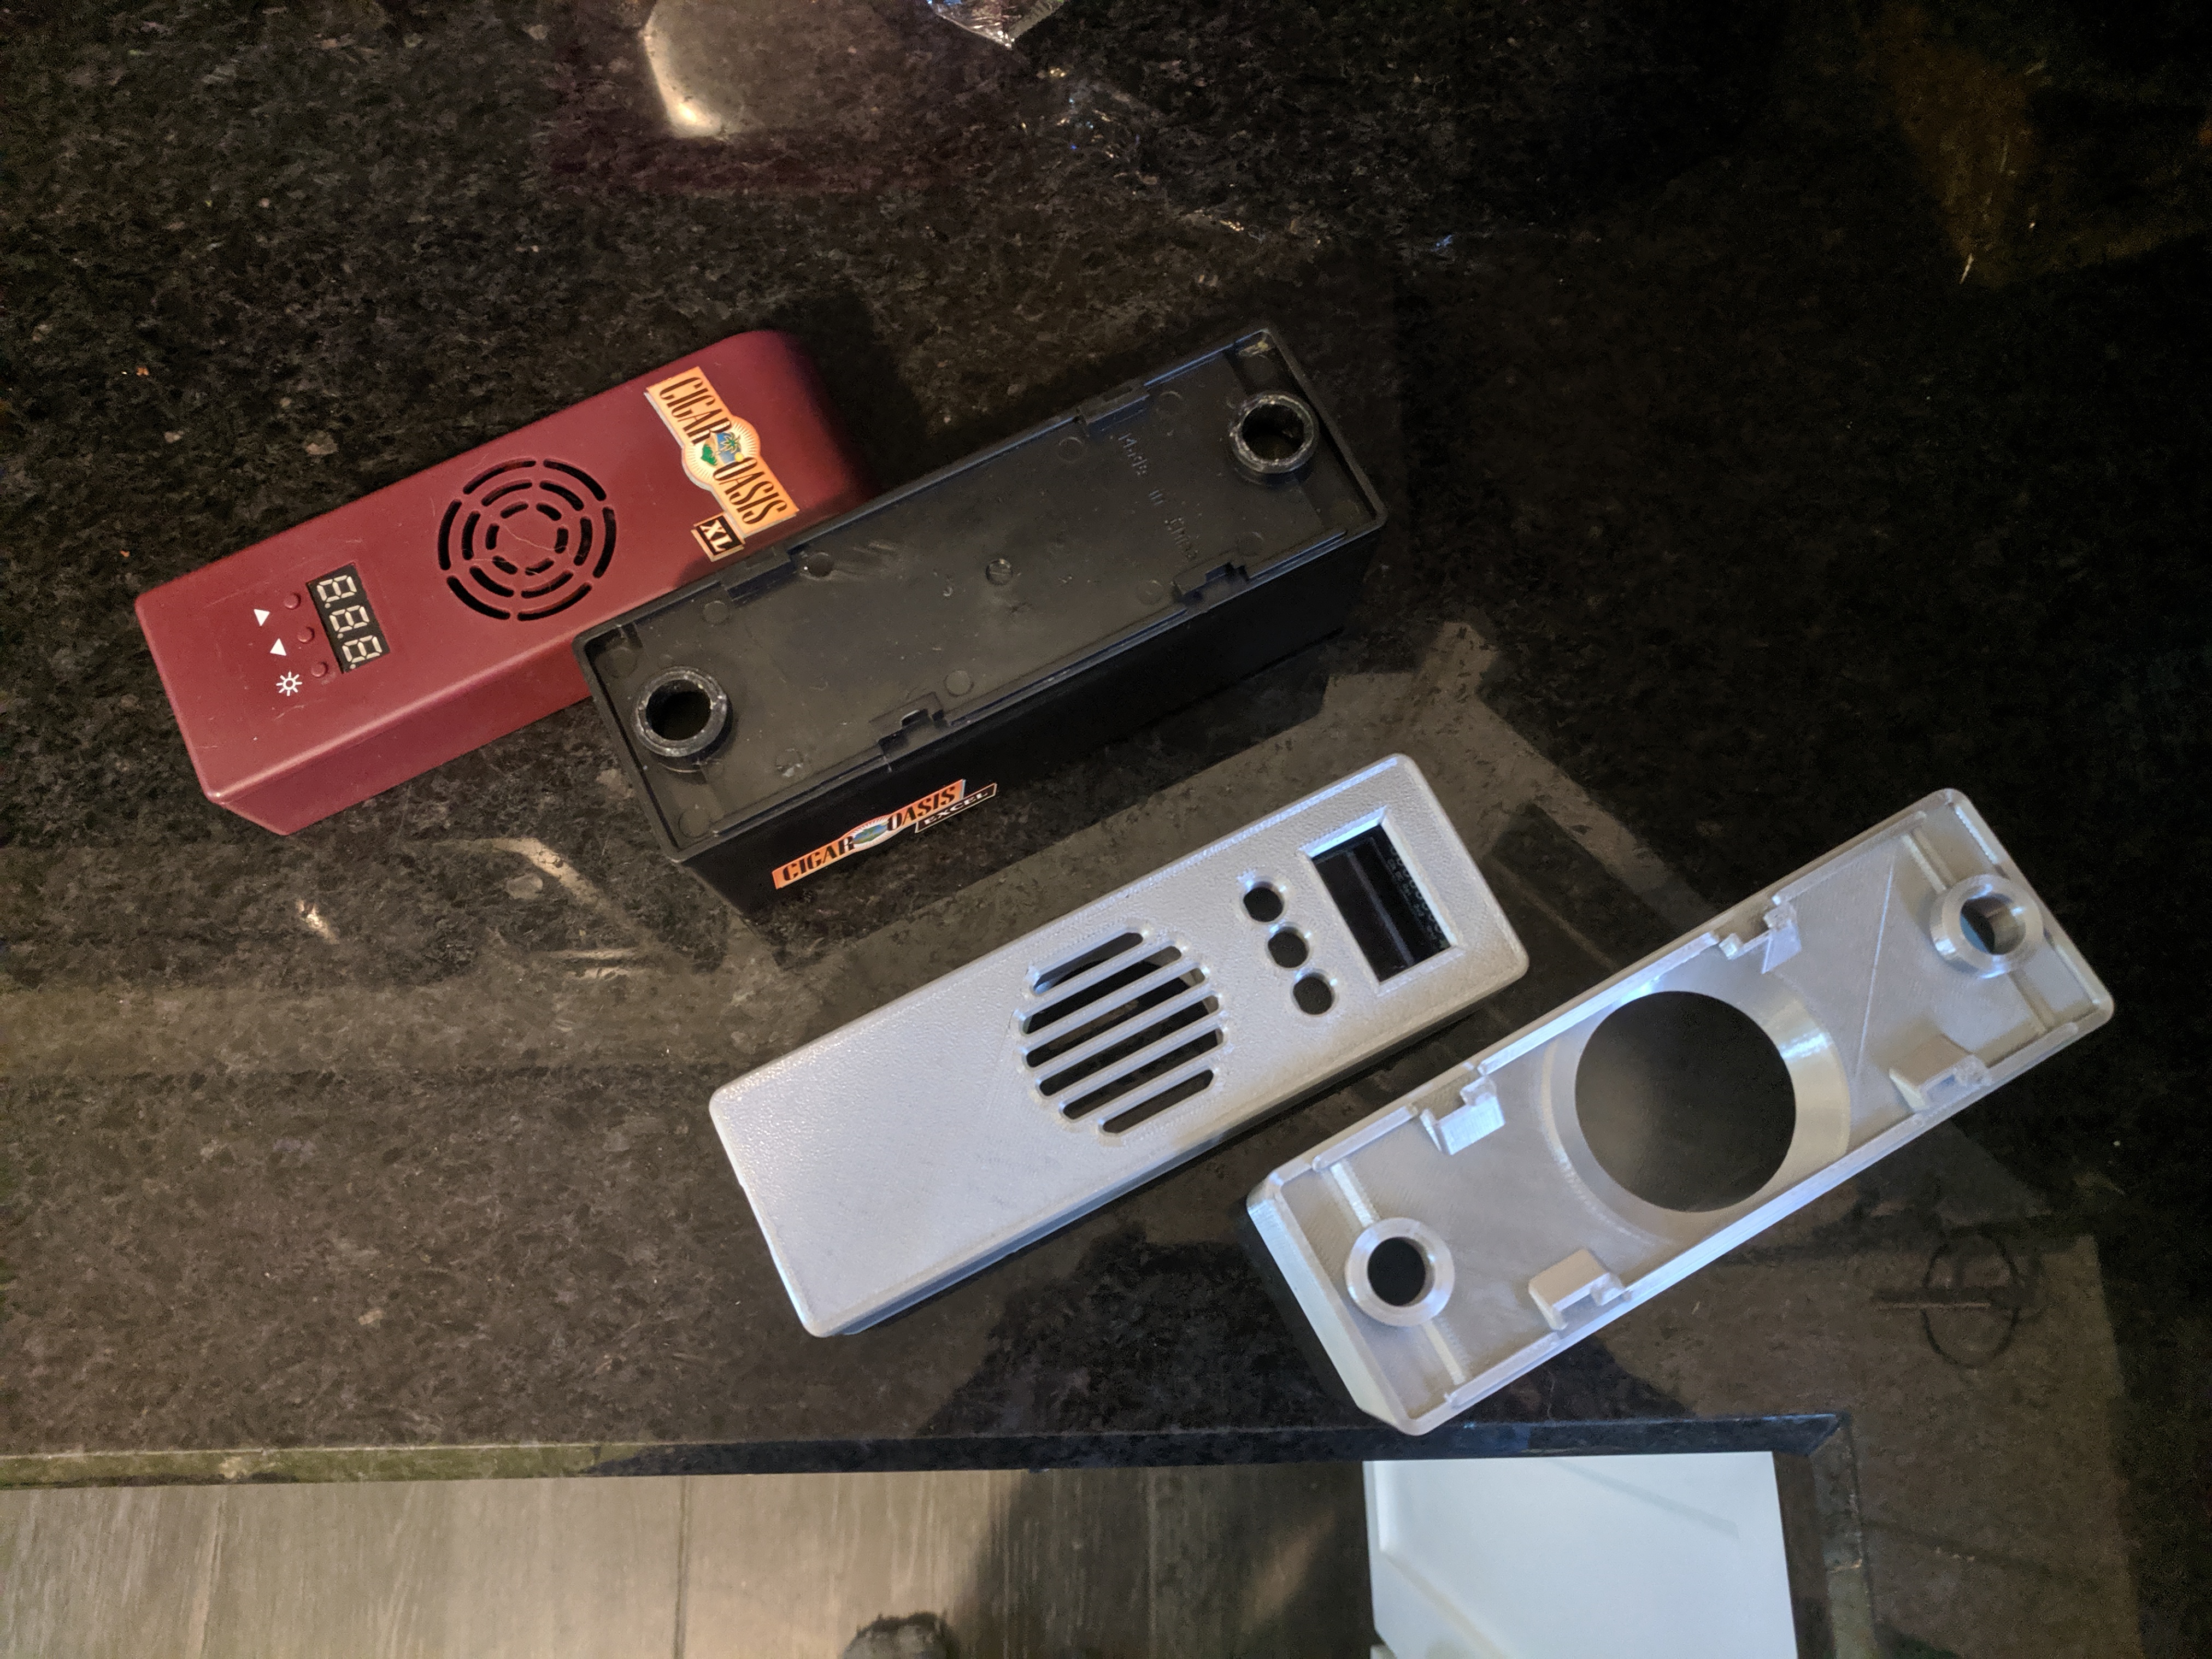
The silver is my own container version. I plan on using an Adafruit OLED as the screen.
3. So I just used some generic cigar humidor beads off of Amazon. They just release humidity over time and the fan helps circulate the humidity a little better. After using the beads it really made me wonder how much the Oasis really does. IMO the Oasis is a minor aid at that point while using the beads. Finally while on this topic would highly recommend some anti-fungal – anti-mold additive!!!
4. I wasn’t familiar with Homebridge but it looks pretty good. I like anything that is lightweight when it comes to this type of software. In the past I’ve used OpenHAB and Home Assistant and honestly hated them both. They were too heavy for what they did and took forever to startup and restart. In which I stuck with node-red only and just made a dashboard with it to control and monitor everything. Have an nginx proxy with everything password protected so I can access the dashboard from anywhere. I’m guessing since this uses the Tasmota firmware. There should be other examples on how to make it all work with any good automation system.
Hope that helps and if you want the Fritzing file I’ll link it here.
Thank you for the additional information. I don’t have a Cigar Oasis so I think my build will be based on a different container so I’ll likely end up modeling up a case for this. From your diagram and your explanation your new tank has three fans, looks like those just get plugged into the three two-wire connectors at the “top” of the board?
You mention the light sensor, what was the plan for that? I don’t think I’d need it but I’m curious.
Thanks again!
As far as the fans go that is correct. The Magna has three fans, two – 40×10 (using the NPN Trasnistors) and one – blower fan (using the TIP120 Transistor). I scraped/cut the negative traces on the back of the proto-board to separate out the three fans. To which I can control them individually, which helps keep the noise levels down when it just needs to circulate the humidity.
In regards to the light sensor, I originally added it as a plan for some analytics, e.g. how much I was opening/going into my humidor. However, after setting up the first DIY Oasis you can really see a HUGE drop in humidity on the dashboard graphs when you open the humidor. Its easily to 10-20% humidity change in under a minute. So, basically the humidity sensor was enough to tell me how many times I was going into the humidor, eliminating the need or want for the light sensor.
Also, some details about Neo Pixel LED (The 3-pin connector in the photo). I’m using it as a visual to show the humidity level in the cabinet. [Red = Dry 67% Humidity & Below] – [Green = Desired Humidity] – [Yellow = 84% Humidity & Above ]. The colors and percentages could probably be setup a bit better.
Edit:
Let me add one more thing in that an easy piece to overlook is how you would get power into the humidor to this device. You can get the Oasis style ribbon cable & connectors on ebay since you’re not taking an existing unit apart. It really is important to always keeping a good seal on your humidor at all times!
Hello!
Thank you for sharing this extremely informative and detailed walkthrough.
I also have the original cigar oasis. Can you advise where I can get the power cable? I do not even know what type of power supply the ribbon cable is.
Thank you!
It really depends on if its the 3-pin or 12-pin (2.0 Cable).
– If it’s the 12 pin you can get it directly from Cigar Oasis’s website.
– If it’s the old three pin like what I have in this tutorial, it’s a bit harder. They used to be all over eBay and Google but I don’t see them anymore. In which case you can try Ali Express by searching “3pin ffc/fpc cable” but that will take you down a crazy rabbit hole. To where my advice ends since I have found random items on Ali and solder up my own.
– As for the power cable it should be a 12v DC power connector but I have no idea what model you have to give proper advice. I’m probably not the best person to ask either. You can try asking this group: https://cigarforums.com/t/cigar-oasis-power-adapter-info.43877/ since it seems to have been asked before.
So, I’m pretty far from the expert on this replacement topic. Definitely check some cigar forums and ask there since they will have a better idea between all the models available.